 Skip to content
Introduction
This Quick Tutorial will teach you the most efficient method for “removing” backgrounds from images quickly and easily using Macromedia Fireworks 8. This is one of the most frequently asked question on Macromedia’s and other Fireworks related public forums and the typical answers that are provided often describe methods that are less than ideal because they are based on old, inefficient techniques learned in pure raster image editing applications like Photoshop.
Fireworks has better and more flexible ways to perform this common task that yield better looking results as well as being non-destructive which means that editing the result at a later date is not only possible but straightforward. With the release of Fireworks 8, users now have access to new functionality that makes this common task easier than ever before by combining the strength of Fireworks’ vector and bitmap tools. It works best on images that have plain, even backgrounds but the techniques learned here will help you deal with this task on any type of image.
As this is a Quick Tutorial, the explanations will move along pretty fast as I assume that you have at least a basic knowledge of image editing in general and of using Fireworks in particular. I won’t stop to explain all that each tool can do and how they work in detail but seeing how they are used to perform the following tasks will give you much more insight than dry explanations ever could. I also provide illustrations that will make things very clear. I have also provided files that you can use to work through this tutorial and follow along each step. One file is the start file and only contains the ring image. The second one is a completed file that contains not only the final image, but also layers which illustrate each step of the tutorial. Just turn on each layer in turn to see how your work should look like at each step. You can download the files here:
Tutorial assets (Zip archive, 411Kb)
Removing A Plain Background The Old Fashioned Way

Before we start looking at how to accomplish this task in Fireworks 8, let’s look at how this was traditionally done first. Comparing the two methods and their results will clearly demonstrate the advantages of doing it the Fireworks way.
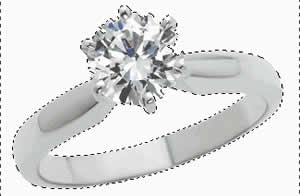
The image we’ll work with in this tutorial is the easiest type of image you’ll have to deal with when performing this kind of task because it has a plain and even background of a single color (see Figure 1). Traditionally, you would use the Magic Wand tool to select the background around the image and delete it. You would then select the background inside the ring and delete it as well.
There are two problems with this commonly used approach. The first one is that it is destructive and irreversible. You cannot modify the remaining object’s contour after removing the background and if you are not satisfied with the result you would need to start from scratch. With this diamond ring image that wouldn’t be much of a hassle because you are only redoing 4 simple operations but if your image background was more complex it could become a tedious task to redo all the selections on a fresh copy of the image in order to delete its background.
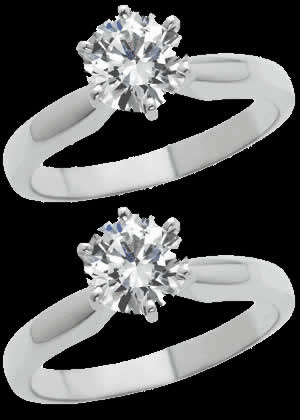
The second problem is that, no matter how carefully you make your selection, pixels with the color of the old background will probably stay behind on the contour of the image and will show when you place the image over a new background (which is usually the goal of the whole exercise to begin with). You could increase the Magic Wand tool’s Tolerance setting to eliminate more or all of the old background’s pixels but in any case, the edge of the image will be jagged. Look at Figure 2 to see an example of removing the background on the diamond ring image and then placing that image on a black background.
In the top image of Figure 2, the Magic Wand tolerance was set to 2. Notice the unsightly white pixels that were left behind. Not good. In the bottom image, the tool’s Tolerance was set to 4 and the white pixels are pretty much gone but see how jagged the contour’s edge is. In both cases the Magic Wand’s Edge setting was set to Anti-Alias so the jagged edge is not due to a selection with a hard edge. Using feathering would only marginally improve the result in that it would alleviate the jagginess problem but we would loose the edge sharpness that we had when the ring appeared over its original white background and the result would look fuzzy and unnatural.
In Fireworks, a workaround that is sometimes recommended to try and minimize the jagginess of an image’s edge after removing its background the way I described above is to apply a glow effect to the resulting image with a Width of 2, Opacity of 100% , Softness of 1 and with the color of the new background. To my eye it still doesn’t look good enough when the new background color is different enough from the original and if you switch to yet another background color you have to modify the glow’s color as well… tedious and annoying.
There is a better way that will avoid any jagged edges, preserve the sharpness of the contour and anti-alias it to any background color you choose without requiring any additional work on your part. Welcome to the Fireworks 8 way.
Removing A Plain Background the Fireworks 8 Way
Now that you have seen the old fashioned way of removing a plain background, you will learn how to do it more efficiently in Fireworks 8 by using its unique blend of bitmap and vector tools. Start by opening both the starting and final PNG files you downloaded before. The start file already contains the same diamond ring image you saw in Figure 1 which you will be using to perform the steps in this tutorial. So let’s begin!
Step 1: Select the Magic Wand tool and, in the Property Inspector, give it a Tolerance value of 4 and set the Edge to Anti-Alias. Then click in the middle of the ring to select the hole inside. Next, press and hold the Shift key with the Magic Wand still active and click outside the ring to add the background around it to the selection. You should end up with something that looks like Figure 3. You can also look at the “Step 1 & 2” layer in the final PNG file and select the diamond image. I have saved both the inside and outside of ring selections as well as the complete one and you can recall any one of them by going to the Select menu and choosing “Restore Bitmap Selection”. You need to have the ring image selected with the black arrow tool in order for that menu item to be active.
 Fig. 4: Only the ring is selected after
the background selection was inverted.
Step: 2: Here is where the steps start to differ from the old style method I described before. Traditionally, you would delete the image’s background at this point but here, we will achieve the same result by applying a vector mask that reveals only the ring image instead. In order to do that, we’ll need to modify the selection we have now since we want it to cover the actual ring and NOT the background around it as it does now. This is a simple one step process. With your bitmap selection still active (as in Figure 3), go to the Select menu and click “Select Inverse”. The bitmap selection now covers the ring instead of the background of the image. To see how this should look like, take a look at Figure 4 or, in the final PNG file, select the ring image in the “Step 1 & 2” layer and go to the Select menu to restore the “Ring Only” saved bitmap selection.
 Fig. 5: Resulting vector shape still selected
after bitmap selection conversion.
Step 3: Next we’ll use the new Fireworks 8 feature that makes all of this possible. With your ring selection still active, open the Select menu again and click “Convert Marquee To Path”. Our bitmap selection has just been transformed into a vector shape that follows the selection’s contour and has the default Stroke and Fill settings that were selected in the main toolbox. In my case there was no stroke set and I got a solid red fill and the result looked like Figure 5. That red fill will need to be changed to a white one in order to be used as a mask that will “remove” the ring’s background but, in the Additional Notes and Tips section at the end, I’ll show you how that red fill can be useful (if you lower the shape’s opacity) to create what’s often called a “ruby mask”. For now let’s move on with our masking task.
Step 4: Leave the vector shape selected or select it again if you need to and remove the stroke in the Property Inspector if your shape has one then change its fill to a solid white fill.
Note: If you deselect the vector shape now, you should see a barely visible dark outline around it which is the only part of the ring that our mask will not cover (see the “Step 4” layer in the final PNG file).
 Fig. 6: The ring after applying the vector mask.
Step 5: We’re now ready to apply the mask to the ring image. Switch to the Black Arrow tool and click anywhere in the gray area outside the canvas to deselect everything. Then, shift click on both the ring image (click on its background outside the white vector shape) and on the vector mask shape itself so that both are selected and finally go to the Modify menu and click on “Mask” then on “Group As Mask”. Your work should now look like Figure 6.
Editing the Mask
Notice how much cleaner the edges look in Figure 6 compared to both images in Figure 2. The background in the starting PNG image you downloaded at the beginning of this tutorial was black but you didn’t see it because the bitmap image’s background covered it. The PNG file’s black background was revealed when you performed the “Group As Mask” step above. We can change that background color at will now and Fireworks will always correctly anti-alias the edges of the masked ring to any background color you choose automatically.
To visualize this, go to the Property Inspector now and choose different background colors to see how the edge of our ring will look against them. You’ll see that the edge of the ring does get anti-aliased correctly to each new background color which was definitely not the case with the resulting image you got with the old fashioned method. The difference in the quality of the results between both methods is quite significant as well and, with vector masks such as this one, the process is never irreversible and the mask remains editable at all times. Since no pixels in the ring image ever got deleted we can still tweak the vector shape and try to get better results.
Fig. 7: The highliighted areas need some work.
Look at Figure 7 to see the two areas I have circled in red and which I think should be tweaked. If you zoom closer to the image you’ll clearly see why they need to be edited. Look at the “Areas that need editing” layer in the final PNG file and zoom to about 400%. On the left, notice how the original selection did not closely follow the inside curve of the ring. The problem is even more obvious in the right area where the point doesn’t go far enough to the right and the curve at the bottom doesn’t closely follow the curve of the ring leaving a “strip” of white that looks out of place against our contrasting black background. Moving the rightmost anchor one pixel to the right and editing its curve handles cured the problem quickly. A little tweaking of the position and handles of the anchors in the left area also fixed the curve in no time.
Fig. 8: Final result after tweaking the mask shape.
In Figure 8 you can see the results of my final tweaks and how they improved the edge of the image in those areas. If you’d want to be more picky, you could also edit the vector mask path around the diamond itself where the mask has left a few white areas. It looks pretty good as it is but you could always edit it by hiding or revealing parts of the underlying image until you are satisfied. This is something that is simply not possible when using the old fashioned method as the pixels that are gone are gone for good and the only thing you could do is remove more pixels.
Additional Notes & Tips
Building On The Technique
There are many methods you can use to create a vector mask. The one shown in this tutorial is effective because it avoids the need to draw complex shapes with the Pen tool which would have been the only way to create a mask for this image in prior versions of Fireworks. It will only be as easy as it’s been here when you work with images with equally simple backgrounds.
But how would you go about removing more complex backgrounds. A lot of times, you would use a technique that is similar to the one we used here but you would build your selection by adding up smaller areas. With our ring image we were lucky that this was a simple two clicks process, one click inside the ring and a Shift-Click outside the ring to add that area to the inside of ring selection. It won’t always be this easy and you may have to use a mix of the various bitmap selection tools and you may have to resort to finishing the mask shape with the Pen tool. One trick you can use to experiment freely or spread the task between multiple editing sessions is the “Save Bitmap” feature I have used to demonstrate how the sections you made should look. You can save any bitmap selections you need and restore them at any time to continue working. A saved selection will still be available after you transform it to a vector shape so use them freely.
With some images it may help not to think of the process as removing the background but instead as “lifting” up the object from the larger image. The object you want to keep may have more areas of similar colors than the background and you may try to select it directly.
Another thing you can do is to mix various vector shapes you obtained from selecting parts of the background or the object you want to “lift” from the image and join or punch them as needed. Just remember that the final mask shape should cover the object you want to keep. In order to see better how your vector mask shape covers the underlying image, use the technique I describe next.
Ruby Mask
The Ruby Mask technique is derived from the Photoshop “Quick Mask” feature which lets you “paint” a bitmap selection directly on the canvas using Photoshop’s paint tools instead of its usual bitmap selection tools. When Photoshop is in “Quick Mask” mode, the selection you paint in does not look like the usual “marching ants” you get with regular bitmap selection tools. Instead, Photoshop draws your paint strokes as a translucent red film over the underlying image. The name “Ruby Mask” is derived from the real life rubylith films used in the printing world.
How it becomes useful in Fireworks is that, as you work on, draw or edit your vector mask shape, you can set its fill color to red and change the object’s Blend mode to Overlay. In Fireworks versions prior to version 8, you could simply lower the object’s opacity to a value of around 40%. After you have done either, you can tweak the vector shape’s contour and see where its edge is in relation to the masked object’s edge in the underlying image. It works really well and let you see clearly how well your edits improve the vector mask shape.
 Fig. 9: Close-up of our vector mask shape as a
Ruby Mask on top of the diamond.
If you look in the “Ruby Mask” layer in the final PNG image you downloaded, you’ll clearly see how closely the vector shape that resulted from converting the bitmap selection really follows the ring image’s edges. Figure 9 also clearly illustrates the concept as I zoomed close to the diamond itself (400%) and you can see clearly where the Magic Wand tool didn’t select the diamond’s contour correctly. It is almost perfect in places and not so good in others but if you edit the vector path now you’ll be able to see the underlying image and make much more precise edits. This is a very useful technique that I use all the time myself. Using it will dramatically improve your vector masking work as well.
In Conclusion
As you can see, creating complex vector masks is easier than ever with the new features in Fireworks 8. While the technique described here won’t help you in every situation, it should make you masking work a lot easier for many images. When you mix in this technique with Fireworks’ other sophisticated vector drawing and editing tools, you should be able to remove the background or “lift” objects from any image.
I hope that this tutorial will be useful to you and that you learned some new things.